Dynamic Resource Scheduler
Whats New!
User Experience Changes
Security and Authentication
Modules and Utilities
Cyclical Scheduling - Configuration Interface
Cyclical Scheduling - Now Bulk Scheduling
Resource Quotas Improvements - Percentages
Architecture and Scheduling
Configuration
User Guides and Help
Get to Know Dynamic Resource Scheduler
How Does Dynamic Resource Scheduling Work
Speaking the Language of Scheduling
Navigating Dynamic Resource Scheduler
How your Data Links Together
Managing your Organisation
Viewing your Data
Your Customer Data
Your Service Orders
Your Jobs
Your Workers and Resources
Manage Your Tasks
Actioning your Jobs and Tasks
Job Templates
Find A Jobs Possible Workers
Locking Your Jobs
Create a Follow On Task
User Queues and Organising Your Tasks
Schedule and Organise
How to Optimise Your Scheduling
How to Schedule Manually
Scheduling Mutliple Jobs at Once
Reassign and Reschedule your Tasks
Managing Your Time and Durations
Managing your Comments and Contacts
Using Bookmarks to Drive Efficiency
Managing Your Job Status
Visualising Your Planning
Workers and Resources
Advanced Data Management
Creating Unavailability in your Workforce
Adding an Unavailability to an Individual Worker
Creating Unavailabilities for Multiple Days or Workers
Maps And Journey
Using Maps to Visualise Your Data
Using Maps With Your Data
Learn about our Closest Function
Your Journeys
Meetings and Non-Productive Planning
Administer Your Scheduler
Managing Your Organisations and Agencies
Managing Your Custom Data
Managing your Contracts
Customising Your Experience
Managing Depots and Starting Locations
Managing Diary Bookmarks
Managing your External Chart Views
KPI Settings
Managing Your Priorities
Learn about Sectors
Managing Your Follow On Templates
Get To Know Your Working Time Calendar
Managing your SOR Templates
Managing your Job Templates
Managing Your Vocabulary
Managing Your Bookmarks
Manage Your Customer Templates
Get to Know Import and Export
Managing Your Tenant Code Rules
Managing your Order Templates
Managing Your Unavailability Reasons
Get To Know Your Working Time Calendars
Managing your Worker Templates
Releases and Readiness
DRS 6, DRS 5.7 and Job Manager
User Guides and Help
Get to Know DRS
Dynamic Scheduling - How does it work
Navigating DRS
Vocabulary and Concepts
Customers
Orders
Jobs
Scheduling Jobs
Job Functions
Workers
Views
Object Inheritance
Agencies
DRS Modules
Scenario Based Planning
Managing your SMS Service
5.7 Documentation
Technical Documentation
Release Notes
DRS 6.1 Release Notes
DRS 6.1.22 - February 20, 2026
DRS 6.1.21 - September 10, 2025
DRS 6.1.20 - April 20th, 2025
DRS 6.1.19 - 11th April, 2025
DRS 6.1.18 - 13 February 2025
DRS 6.1.17 - 20th December 2024
DRS 6.1.16 - November 8th, 2024
DRS 6.1.15 - October 10th, 2024
DRS 6.1.14 - 6th September 2024
DRS 6.1.13 - 9th August 2024
DRS 6.1.12 Release Notes
DRS 6.1.11 Release Notes
DRS 6.1.10 Release Notes
DRS 6.1.9 Release Notes
DRS 6.1.8 Release Notes
DRS 6.1.7 Release Notes
DRS 6.1.6 Release Notes
DRS 6.1.5 Release Notes
DRS 6.1.4 Release Notes
DRS 6.1.3 Release Notes
DRS 6.1.2 Release Notes
DRS 6.1.1 Release Notes
DRS 6.1.0 Release Notes
DRS 6.0 Release Notes
DRS 6.0.0.0 Release Notes
DRS 6.0.0.1 Release Notes
DRS 6.0.0.2 Release Notes
DRS 6.0.0.3 Release Notes
DRS 6.0.0.4 Release Notes
DRS 6.0.0.6 Release Notes
DRS 6.0.1.0 Release Notes
DRS 6.0.1.1 Release Notes
DRS 6.0.1.2 Release Notes
DRS 6.0.1.3 Release Notes
DRS 6.0.1.4 Release Notes
DRS 6.0.1.5 Release Notes
Kirona Housing
Job Manager 9
Job Manager 9.3.0 - October 2024
Job Manager 9.1.0 - December 2022
Job Manager 9.2.0 - November 2023
Release Notes Disclaimer
Administering your Field Service Products
Supported Versions Policies
Contents
Navigating DRS

Purpose
The following article is designed to help you understand how to navigate DRS. It covers a brief explanation of key concepts and screens, designed to give you the skills needed to begin your learning journey with DRS.
Home
The DRS Home Screen contains charts that can highlight important details within your solution. These charts do not allow the user to drill down but are designed to provide a quick point of reference at the point of login for anything they may want to immediately follow up on.
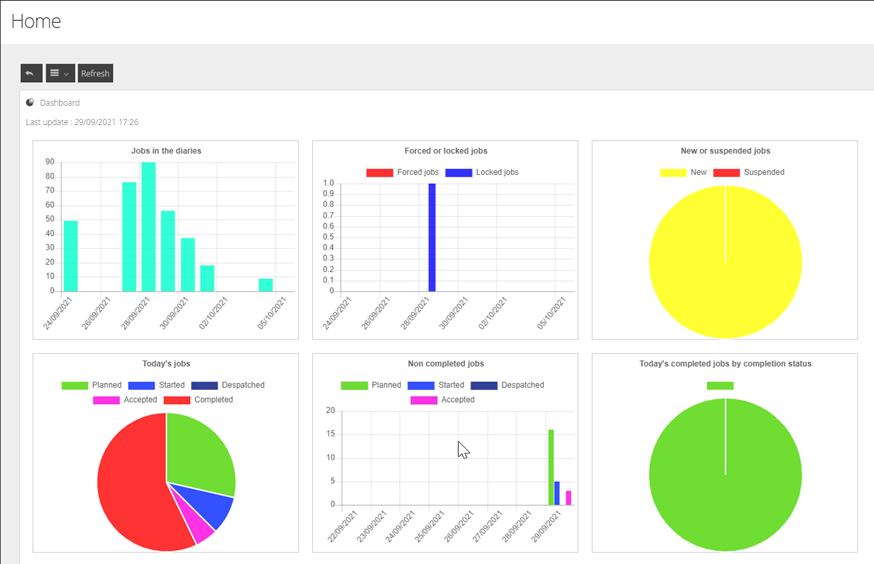
If you are a OneAdvanced Infosuite customer, charts can also be displayed within DRS from Infosuite. Please review the Administration section of our articles to learn more about this.
Left Hand Panel
Within DRS, the menu items are displayed on the left side of the application window.
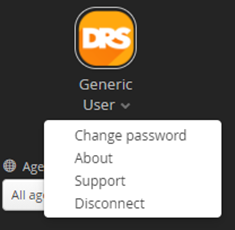
Underneath the DRS Logo, you will see your current logged in Username. Selecting the username will enable users to change their password, disconnect, change language, and view the about details for the application.
Version
The Version of DRS you are currently running can be found in the top right-hand corner of your screen.

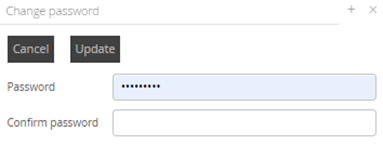
Change Password
Change your password by clicking the chevron and selecting Change Password.
Once changed, Click Update and your new password will be required at your next logon
Logging Off
Logoff by clicking on the chevron below your Username and selecting Disconnect.

Detach
Using the Detach button will take DRS out into a new tab within your browser. This is a full instance of DRS and can be used independently for both read and modify tasks.

Left Bar Details
The left bar menu is used to navigate the majority of the solution. The chevron on the right edge can be used to collapse the left bar.
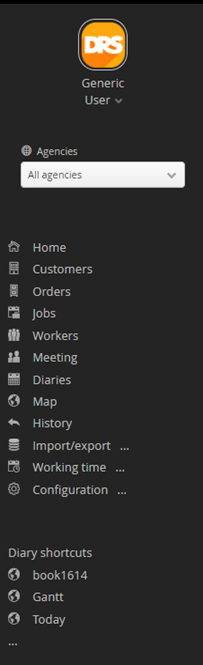
Home | When selected returns users to the home screen, any dashboards present here will display |
Customers | When selected will take users to the customer screen displaying a list of customers in the view. |
Orders | When selected will take users to the order screen displaying a list of orders in the view. |
Jobs | When selected will take users to the job screen displaying a list of jobs in the view. |
Workers | When selected will take users to the workers screen displaying a list of workers in the view. |
Meeting | If enabled will take users to the meeting screen to create meetings within the system. |
Diaries | When selected will take users to the diary menu options to select operatives, jobs or from a bookmark. |
Map | If enabled/licensed will take users to the maps screen, where addresses and postcodes can be searched. |
History | Will allow users with permission to search the history/audit of customers, jobs, orders, workers etc. |
Project Planner | If enabled/licensed will allow users to expand the Project Planner functional menus |
Import/Export | When selected will provide a sub menu with import and export options |
Working Time | When selected will open a sub menu with options to create, edit and view day off calendars, working hours calendars and daily schedule types |
Configuration | Requires administration rights and allows users access to the configuration elements of the system such as Templates, Text Messaging, Views, Users and Profiles, Business Data etc. |
Scrolling vs Pagination
Access to the data not seen on a single screen is now controlled by scroll bars on the right side of the various data tables. There is no pagination in DRS v6. All data returns are limited to 1000 records maximum but where more detail is available, this can be accessed through filtering or the use of the Export function.
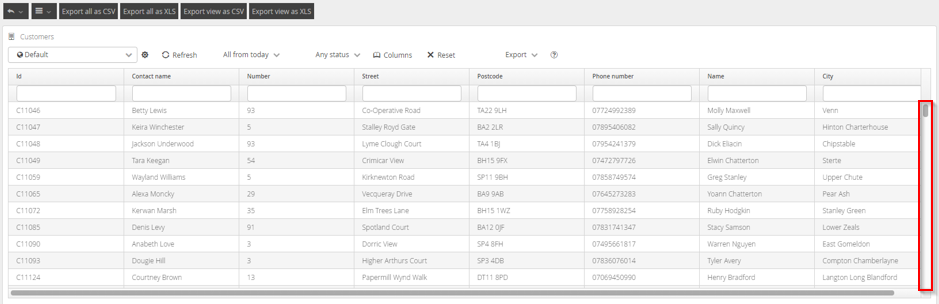
Adding additional filters to limit your result return can also display any required data.
Navigation Options
Within all View screens, some Navigation options are available.
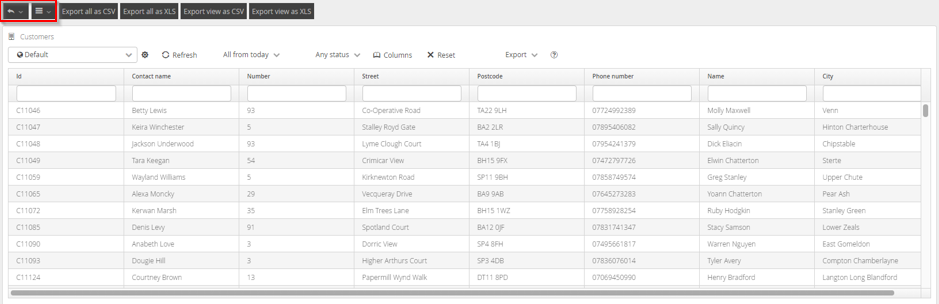
Back Button
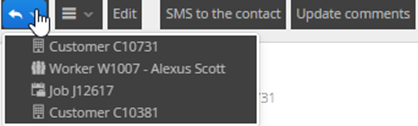
The Back Button can be found on all menus where table data is displayed. You can use this to navigate back through your previous selections. Clicking on the chevron will display the last selected objects. Clicking one will take you to that object.
Burger Menu
The Navigation Menu contains the following options:
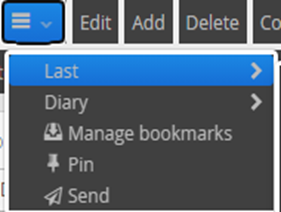
Last: Detail of the last items selected within the system. Navigate to these items by selecting one.
Diary: List of all available Diary Bookmarks
Manage Bookmarks: You can use this to edit or remove bookmarks, where your permissions allow.
Pin: Pin allows you to create a Bookmark of single or groups of items. More information on this function can be found in the BOOKMARKS section of this document.
Send: Selecting a single or number of items will allow you to send those items to other Users. When they are sent, they will appear within the other Users Bookmark list and a new item icon will be displayed to let them know it is available
Keep
The keep function allows you to place items within a held list while you work within the categories DRS v6. This function can be helpful if you are attempting to locate many different objects with different filtering requirements.
Selecting your objects and then clicking KEEP from the top menu will put the values within the Keep List to allow you to make changes, send Text Messages, Schedule, and other bulk selection functions.
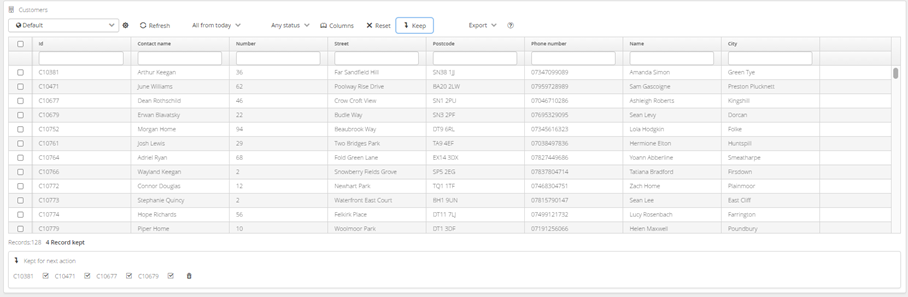
Once you have added items to your keep list, you can select your action, such as Schedule Now, and that action will be executed on the items within your Keep list, along with any items selected in the main view.
The Keep List can be cleared by clicking the Trash Can or individual items can be removed by clicking on the individual ticks next to the items in the list, this function works largely in the same way for all screens where it appears. These items can be used to interact with other functions such as Maps, Filtering, Schedule Now, Lock etc.