Dynamic Resource Scheduler
Whats New!
User Experience Changes
Security and Authentication
Modules and Utilities
Cyclical Scheduling - Configuration Interface
Cyclical Scheduling - Now Bulk Scheduling
Resource Quotas Improvements - Percentages
Architecture and Scheduling
Configuration
User Guides and Help
Get to Know Dynamic Resource Scheduler
How Does Dynamic Resource Scheduling Work
Speaking the Language of Scheduling
Navigating Dynamic Resource Scheduler
How your Data Links Together
Managing your Organisation
Viewing your Data
Your Customer Data
Your Service Orders
Your Jobs
Your Workers and Resources
Manage Your Tasks
Actioning your Jobs and Tasks
Job Templates
Find A Jobs Possible Workers
Locking Your Jobs
Create a Follow On Task
User Queues and Organising Your Tasks
Schedule and Organise
How to Optimise Your Scheduling
How to Schedule Manually
Scheduling Mutliple Jobs at Once
Reassign and Reschedule your Tasks
Managing Your Time and Durations
Managing your Comments and Contacts
Using Bookmarks to Drive Efficiency
Managing Your Job Status
Visualising Your Planning
Workers and Resources
Advanced Data Management
Creating Unavailability in your Workforce
Adding an Unavailability to an Individual Worker
Creating Unavailabilities for Multiple Days or Workers
Maps And Journey
Using Maps to Visualise Your Data
Using Maps With Your Data
Learn about our Closest Function
Your Journeys
Meetings and Non-Productive Planning
Administer Your Scheduler
Managing Your Organisations and Agencies
Managing Your Custom Data
Managing your Contracts
Customising Your Experience
Managing Depots and Starting Locations
Managing Diary Bookmarks
Managing your External Chart Views
KPI Settings
Managing Your Priorities
Learn about Sectors
Managing Your Follow On Templates
Get To Know Your Working Time Calendar
Managing your SOR Templates
Managing your Job Templates
Managing Your Vocabulary
Managing Your Bookmarks
Manage Your Customer Templates
Get to Know Import and Export
Managing Your Tenant Code Rules
Managing your Order Templates
Managing Your Unavailability Reasons
Get To Know Your Working Time Calendars
Managing your Worker Templates
Releases and Readiness
DRS 6, DRS 5.7 and Job Manager
User Guides and Help
Get to Know DRS
Dynamic Scheduling - How does it work
Navigating DRS
Vocabulary and Concepts
Customers
Orders
Jobs
Scheduling Jobs
Job Functions
Workers
Views
Object Inheritance
Agencies
DRS Modules
Scenario Based Planning
Managing your SMS Service
5.7 Documentation
Technical Documentation
Release Notes
DRS 6.1 Release Notes
DRS 6.1.22 - February 20, 2026
DRS 6.1.21 - September 10, 2025
DRS 6.1.20 - April 20th, 2025
DRS 6.1.19 - 11th April, 2025
DRS 6.1.18 - 13 February 2025
DRS 6.1.17 - 20th December 2024
DRS 6.1.16 - November 8th, 2024
DRS 6.1.15 - October 10th, 2024
DRS 6.1.14 - 6th September 2024
DRS 6.1.13 - 9th August 2024
DRS 6.1.12 Release Notes
DRS 6.1.11 Release Notes
DRS 6.1.10 Release Notes
DRS 6.1.9 Release Notes
DRS 6.1.8 Release Notes
DRS 6.1.7 Release Notes
DRS 6.1.6 Release Notes
DRS 6.1.5 Release Notes
DRS 6.1.4 Release Notes
DRS 6.1.3 Release Notes
DRS 6.1.2 Release Notes
DRS 6.1.1 Release Notes
DRS 6.1.0 Release Notes
DRS 6.0 Release Notes
DRS 6.0.0.0 Release Notes
DRS 6.0.0.1 Release Notes
DRS 6.0.0.2 Release Notes
DRS 6.0.0.3 Release Notes
DRS 6.0.0.4 Release Notes
DRS 6.0.0.6 Release Notes
DRS 6.0.1.0 Release Notes
DRS 6.0.1.1 Release Notes
DRS 6.0.1.2 Release Notes
DRS 6.0.1.3 Release Notes
DRS 6.0.1.4 Release Notes
DRS 6.0.1.5 Release Notes
Kirona Housing
Job Manager 9
Job Manager 9.3.0 - October 2024
Job Manager 9.1.0 - December 2022
Job Manager 9.2.0 - November 2023
Release Notes Disclaimer
Administering your Field Service Products
Supported Versions Policies
Contents
Tenant Code Rules
Purpose
This article will help you understand how to best configure the Tenant Code Rules within DRS and why we might use them.
Tenant Codes Rules can be configured to monitor the inbound jobs where they are raised against locations which have Tenant Codes configured.
Tenant Codes (could also be known as Warning Flags) are commonly used to identify customers which have previously been identified to require more than one operative to attend, or other non-default scheduling requirements.
Using this function, we can direct the scheduling of the job away from your standard scheduling rules and onto something more appropriate, responding to the needs or your customers.
How does it work?
The Tenant Code Rules use the value mapped to the Tenant Code Business Data on the Customer record to re-direct the Job Template assignment from the default job template to one that is alternatively defined.
Once a request for a new booking has been received, DRS will confirm the default assigned Job Template and whether there are any Tenant Codes active against the Customer record. If there is, and a matching Job Template translation is found in the Tenant Code configuration, the booking will be assigned the translated Job Template prior to an appointment being offered.
Customer Record
Below shows where the Tenant Code resides on a Customer record. This customer has a Tenant_Code value of VIP (Visit in Pairs)

How do we populate the Tenant Code?
The Tenant code on the customer can be populated in a few different ways
Automatically managed through Integration
Customer records can be updated through the API integration when creating new scheduling records. The integrating system can pass a value through in the relevant API calls for DRS to manage all of the Customer details, including the Tenant Code Business Data.
Manually managed through the UI
The Tenant Code business data can be manually managed through the DRS UI. By searching for the relevant Customer record and clicking Edit
The Tenant Code value can be manually updated and managed.
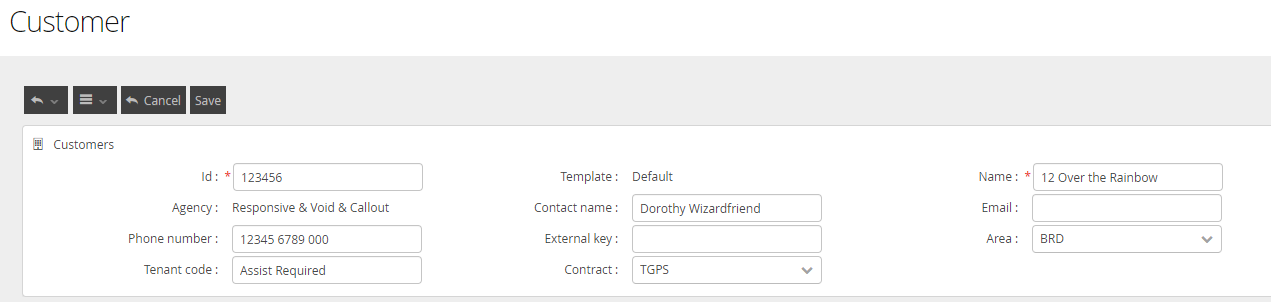
Once the record is updated, click Save for it to become active.
Bulk Update
Using the Import/Export routine, the Customer records can be updated to display any changes, including adding and removing a Tenant Code.
Tenant Code Rules Configuration
DRS > Configuration > Tenant Code Rules
New Tenant code rules can be created as well as copied, viewed and deleted by using the relevant buttons across the top of the page.

When creating new Tenant code rules:
You identify the specific Job Template and what that template will map to as shown below:

By clicking the + Add New Line button you can add multiple tenant warnings within the same window and delete them using the corresponding Delete button
The value you enter within the Tenant Code must be an Exact Match to the values held against the Tenant Code value in the Customer object.
NOTE: Because Tenant Code Rules are free text, multiple tenant code rules can be configured for the same combination of Source Job Template and Target Job Template. In the case of conflicting Tenant Code Rules, the first matching Tenant Code Rule will be used.
What do we see?
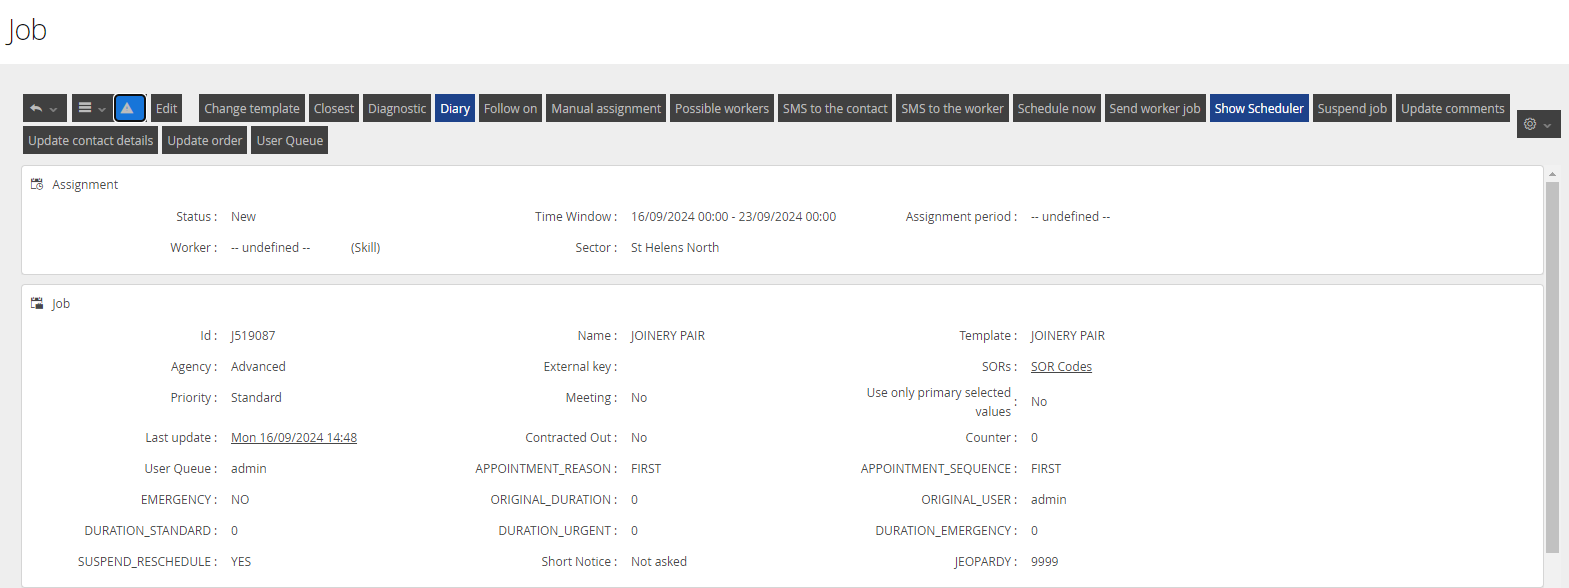
Once a Tenant Code rule has been correctly configured, any recieved job associated with that Rule, Customer and Job Template will be mapped as configured.
In this example, the job was received for the Job Template of JOINERY, with a Customer record who has the Tenant Code of VIP configured.
The resulting created Job has now been assigned the Job Template, JOINERY PAIR.