Dynamic Resource Scheduler
Whats New!
User Experience Changes
Security and Authentication
Modules and Utilities
Cyclical Scheduling - Configuration Interface
Cyclical Scheduling - Now Bulk Scheduling
Resource Quotas Improvements - Percentages
Architecture and Scheduling
Configuration
User Guides and Help
Get to Know Dynamic Resource Scheduler
How Does Dynamic Resource Scheduling Work
Speaking the Language of Scheduling
Navigating Dynamic Resource Scheduler
How your Data Links Together
Managing your Organisation
Viewing your Data
Your Customer Data
Your Service Orders
Your Jobs
Your Workers and Resources
Manage Your Tasks
Actioning your Jobs and Tasks
Job Templates
Find A Jobs Possible Workers
Locking Your Jobs
Create a Follow On Task
User Queues and Organising Your Tasks
Schedule and Organise
How to Optimise Your Scheduling
How to Schedule Manually
Scheduling Mutliple Jobs at Once
Reassign and Reschedule your Tasks
Managing Your Time and Durations
Managing your Comments and Contacts
Using Bookmarks to Drive Efficiency
Managing Your Job Status
Visualising Your Planning
Workers and Resources
Advanced Data Management
Creating Unavailability in your Workforce
Adding an Unavailability to an Individual Worker
Creating Unavailabilities for Multiple Days or Workers
Maps And Journey
Using Maps to Visualise Your Data
Using Maps With Your Data
Learn about our Closest Function
Your Journeys
Meetings and Non-Productive Planning
Administer Your Scheduler
Managing Your Organisations and Agencies
Managing Your Custom Data
Managing your Contracts
Customising Your Experience
Managing Depots and Starting Locations
Managing Diary Bookmarks
Managing your External Chart Views
KPI Settings
Managing Your Priorities
Learn about Sectors
Managing Your Follow On Templates
Get To Know Your Working Time Calendar
Managing your SOR Templates
Managing your Job Templates
Managing Your Vocabulary
Managing Your Bookmarks
Manage Your Customer Templates
Get to Know Import and Export
Managing Your Tenant Code Rules
Managing your Order Templates
Managing Your Unavailability Reasons
Get To Know Your Working Time Calendars
Managing your Worker Templates
Releases and Readiness
DRS 6, DRS 5.7 and Job Manager
User Guides and Help
Get to Know DRS
Dynamic Scheduling - How does it work
Navigating DRS
Vocabulary and Concepts
Customers
Orders
Jobs
Scheduling Jobs
Job Functions
Workers
Views
Object Inheritance
Agencies
DRS Modules
Scenario Based Planning
Managing your SMS Service
5.7 Documentation
Technical Documentation
Release Notes
DRS 6.1 Release Notes
DRS 6.1.22 - February 20, 2026
DRS 6.1.21 - September 10, 2025
DRS 6.1.20 - April 20th, 2025
DRS 6.1.19 - 11th April, 2025
DRS 6.1.18 - 13 February 2025
DRS 6.1.17 - 20th December 2024
DRS 6.1.16 - November 8th, 2024
DRS 6.1.15 - October 10th, 2024
DRS 6.1.14 - 6th September 2024
DRS 6.1.13 - 9th August 2024
DRS 6.1.12 Release Notes
DRS 6.1.11 Release Notes
DRS 6.1.10 Release Notes
DRS 6.1.9 Release Notes
DRS 6.1.8 Release Notes
DRS 6.1.7 Release Notes
DRS 6.1.6 Release Notes
DRS 6.1.5 Release Notes
DRS 6.1.4 Release Notes
DRS 6.1.3 Release Notes
DRS 6.1.2 Release Notes
DRS 6.1.1 Release Notes
DRS 6.1.0 Release Notes
DRS 6.0 Release Notes
DRS 6.0.0.0 Release Notes
DRS 6.0.0.1 Release Notes
DRS 6.0.0.2 Release Notes
DRS 6.0.0.3 Release Notes
DRS 6.0.0.4 Release Notes
DRS 6.0.0.6 Release Notes
DRS 6.0.1.0 Release Notes
DRS 6.0.1.1 Release Notes
DRS 6.0.1.2 Release Notes
DRS 6.0.1.3 Release Notes
DRS 6.0.1.4 Release Notes
DRS 6.0.1.5 Release Notes
Kirona Housing
Job Manager 9
Job Manager 9.3.0 - October 2024
Job Manager 9.1.0 - December 2022
Job Manager 9.2.0 - November 2023
Release Notes Disclaimer
Administering your Field Service Products
Supported Versions Policies
Recurring Job Templates
Purpose
This article is written to help you learn about Recurring Job Templates and how you can implement them within your DRS system.
Recurring Job Templates
Recurring Job Templates allow you to bulk create and auto schedule multiple jobs against a single order, where each job must be scheduled on a specific cycle, e.g. every week, fortnightly, monthly and so on.
Create the Recurring Job Template
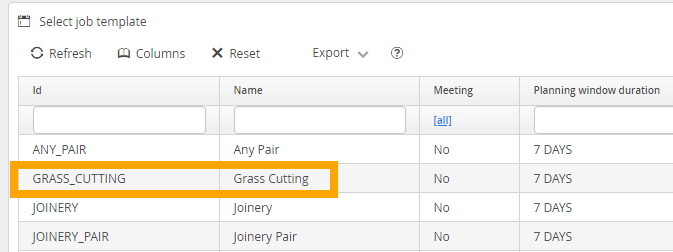
Navigate to the Order, scroll down to the Recurring Job Templates region and click Add.

Select the appropriate Job Template.
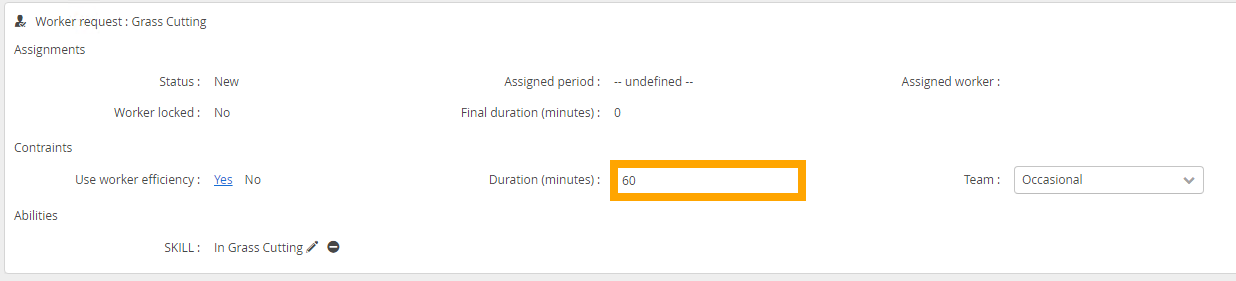
Scroll down to the worker request region and check the job duration. This will be the duration assigned to each job, i.e. each grass cut. If its incorrect you can change it.
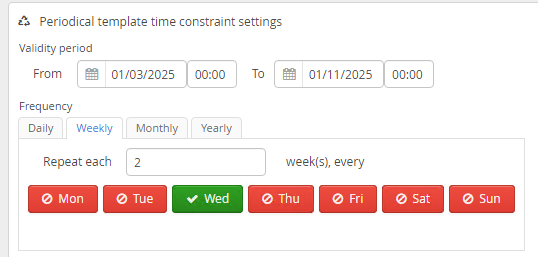
Scroll up to the 'Periodical template time constraints settings' region and enter the appropriate settings.
The validity period sets the range of dates between which the jobs will be created.
The frequency sets which specific dates within the validity period jobs will be created.
The below example will create a grass cutting job for every second Wednesday, between 1st March 2025 and 1st November 2025.
Frequency options
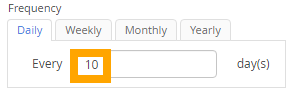
Daily Frequency
Daily. The below example will create a job for every 10th day: 1st March, 11th March, 21st March etc.
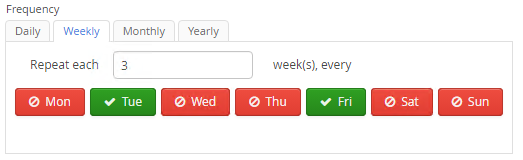
Weekly Frequency
Weekly. The below example will create a job for both Tuesday and Friday every 3rd week: 18th and 21st March 2025, followed by 8th and 11th April 2025 etc.
Monthly Frequency
Monthly using day numbers. The below example will create a job for the 5th of every second month: 5th March, 5th May, 5th July etc.

Monthly using day names. The below example will create a job for the 3rd Tuesday of the month every 3 months: 18th March, 17th June etc.

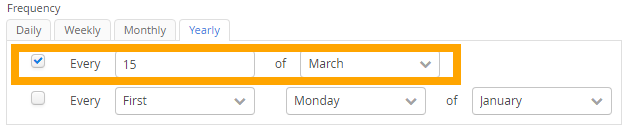
Yearly Frequency
For this to work over multiple years, you'll need to ensure the validity period covers multiple years.
Yearly using day numbers. The below example will create a job for the 15th of March, every year.
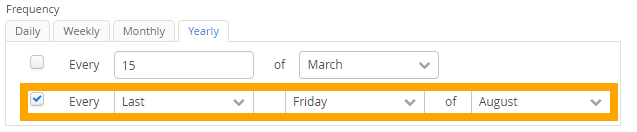
Yearly using day names. The below example will create a job for the last Friday of August, every year.
Appointment Hour
This section allows you to set the job's time constraints start and end times, along with a number of days tolerance (i.e. how many days either side or after the date specified in the frequency section, the job can be assigned).
The below example sets the time constraints to start at 9am and end at 1pm, with zero tolerance. If the frequency stipulates that the job should be created for 5th March, this would ensure the job is assigned between 9am and 1pm on the 5th March.

This example sets the time constraints to start at 9am and end at 5pm, with a tolerance of 2 days either side. If the frequency stipulates that the job should be created for 5th March, this will allow the job to be assigned between 9am on the 3rd March and 5pm on the 7th March.

This example sets the time constraints to start at 1pm and end at 5pm, with a tolerance of 4 days after. If the frequency stipulates that the job should be created for 5th March, this will allow the job to be assigned between 1pm on the 5th March and 3:30pm on the 9th March.

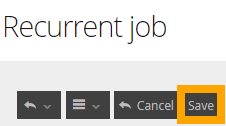
When you have finished entering the appropriate settings into the Periodical template time constraints settings region, click Save.
Generate Instances
The next step is to create and auto schedule the jobs.
The below example uses these settings, with a scheduling horizon of 60 days.

Click Generate Instances.
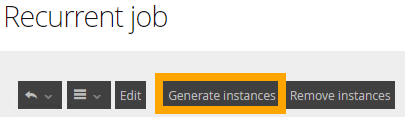
You will then see confirmation of how many jobs have been created and scheduled.

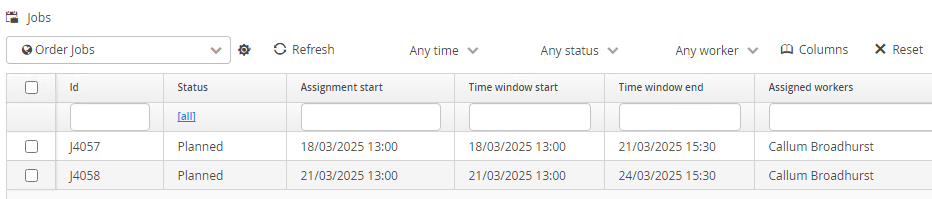
Scroll down to the Jobs sub view to see the jobs.
Jobs that couldn't auto schedule will have a status of New. This could be due to workers having insufficient capacity, not having matching skills and sectors, unavailability, quotas and so on.
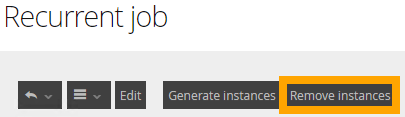
Deleting jobs
Any Jobs that are still New or Planned can be deleted in bulk.
Click the Remove Instances button.
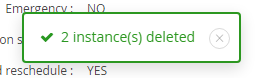
You will then see confirmation of how many jobs have been deleted.
Deleting Recurring Jobs
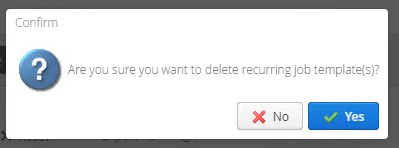
To delete a recurring Job, go back to the parent Order screen, select the Recurring Job and click Delete.
Click Yes to confirm.
Integration
Before implementing Recurring Job Templates in your live DRS environment, you must must check in your test environment that the recurring jobs and parent orders integrate correctly with your other systems (e.g. housing, handheld etc). Often these systems will need to be configured to handle multiple completed jobs per order.