Dynamic Resource Scheduler
Whats New!
User Experience Changes
Security and Authentication
Modules and Utilities
Cyclical Scheduling - Configuration Interface
Cyclical Scheduling - Now Bulk Scheduling
Resource Quotas Improvements - Percentages
Architecture and Scheduling
Configuration
User Guides and Help
Get to Know Dynamic Resource Scheduler
How Does Dynamic Resource Scheduling Work
Speaking the Language of Scheduling
Navigating Dynamic Resource Scheduler
How your Data Links Together
Managing your Organisation
Viewing your Data
Your Customer Data
Your Service Orders
Your Jobs
Your Workers and Resources
Manage Your Tasks
Actioning your Jobs and Tasks
Job Templates
Find A Jobs Possible Workers
Locking Your Jobs
Create a Follow On Task
User Queues and Organising Your Tasks
Schedule and Organise
How to Optimise Your Scheduling
How to Schedule Manually
Scheduling Mutliple Jobs at Once
Reassign and Reschedule your Tasks
Managing Your Time and Durations
Managing your Comments and Contacts
Using Bookmarks to Drive Efficiency
Managing Your Job Status
Visualising Your Planning
Workers and Resources
Advanced Data Management
Creating Unavailability in your Workforce
Adding an Unavailability to an Individual Worker
Creating Unavailabilities for Multiple Days or Workers
Maps And Journey
Using Maps to Visualise Your Data
Using Maps With Your Data
Learn about our Closest Function
Your Journeys
Meetings and Non-Productive Planning
Administer Your Scheduler
Managing Your Organisations and Agencies
Managing Your Custom Data
Managing your Contracts
Customising Your Experience
Managing Depots and Starting Locations
Managing Diary Bookmarks
Managing your External Chart Views
KPI Settings
Managing Your Priorities
Learn about Sectors
Managing Your Follow On Templates
Get To Know Your Working Time Calendar
Managing your SOR Templates
Managing your Job Templates
Managing Your Vocabulary
Managing Your Bookmarks
Manage Your Customer Templates
Get to Know Import and Export
Managing Your Tenant Code Rules
Managing your Order Templates
Managing Your Unavailability Reasons
Get To Know Your Working Time Calendars
Managing your Worker Templates
Releases and Readiness
DRS 6, DRS 5.7 and Job Manager
User Guides and Help
Get to Know DRS
Dynamic Scheduling - How does it work
Navigating DRS
Vocabulary and Concepts
Customers
Orders
Jobs
Scheduling Jobs
Job Functions
Workers
Views
Object Inheritance
Agencies
DRS Modules
Scenario Based Planning
Managing your SMS Service
5.7 Documentation
Technical Documentation
Release Notes
DRS 6.1 Release Notes
DRS 6.1.22 - February 20, 2026
DRS 6.1.21 - September 10, 2025
DRS 6.1.20 - April 20th, 2025
DRS 6.1.19 - 11th April, 2025
DRS 6.1.18 - 13 February 2025
DRS 6.1.17 - 20th December 2024
DRS 6.1.16 - November 8th, 2024
DRS 6.1.15 - October 10th, 2024
DRS 6.1.14 - 6th September 2024
DRS 6.1.13 - 9th August 2024
DRS 6.1.12 Release Notes
DRS 6.1.11 Release Notes
DRS 6.1.10 Release Notes
DRS 6.1.9 Release Notes
DRS 6.1.8 Release Notes
DRS 6.1.7 Release Notes
DRS 6.1.6 Release Notes
DRS 6.1.5 Release Notes
DRS 6.1.4 Release Notes
DRS 6.1.3 Release Notes
DRS 6.1.2 Release Notes
DRS 6.1.1 Release Notes
DRS 6.1.0 Release Notes
DRS 6.0 Release Notes
DRS 6.0.0.0 Release Notes
DRS 6.0.0.1 Release Notes
DRS 6.0.0.2 Release Notes
DRS 6.0.0.3 Release Notes
DRS 6.0.0.4 Release Notes
DRS 6.0.0.6 Release Notes
DRS 6.0.1.0 Release Notes
DRS 6.0.1.1 Release Notes
DRS 6.0.1.2 Release Notes
DRS 6.0.1.3 Release Notes
DRS 6.0.1.4 Release Notes
DRS 6.0.1.5 Release Notes
Kirona Housing
Job Manager 9
Job Manager 9.3.0 - October 2024
Job Manager 9.1.0 - December 2022
Job Manager 9.2.0 - November 2023
Release Notes Disclaimer
Administering your Field Service Products
Supported Versions Policies
Contents
Jobs
Purpose
This article is written to help you learn about the concepts of Jobs within DRS.
What are Jobs?
Jobs / Appointments are created against the order and are mapped using the SOR code to a Job Template in DRS. The template then contains the relevant abilities required to be selected for the job and in conjunction with the sector (populated by the postcode from the Customer record) will find Workers who can carry out the work.
Jobs are created by the order creation sent from the back office in the first instance, although they can be created manually within DRS (if needed) or from follow on’s.
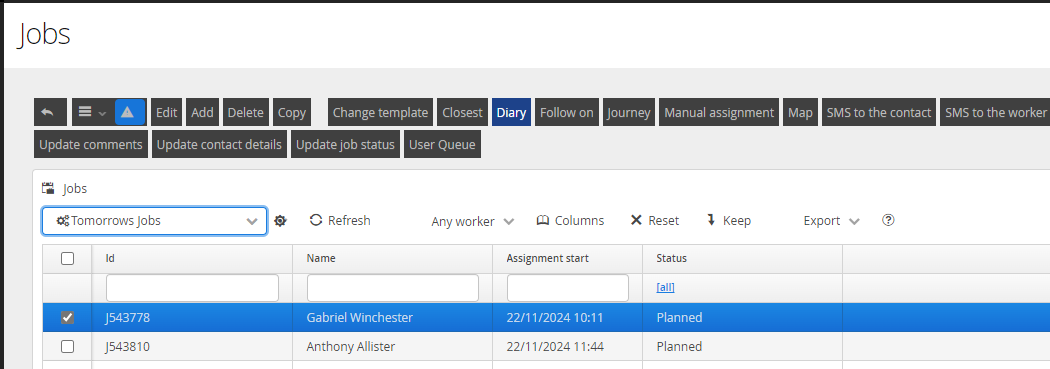
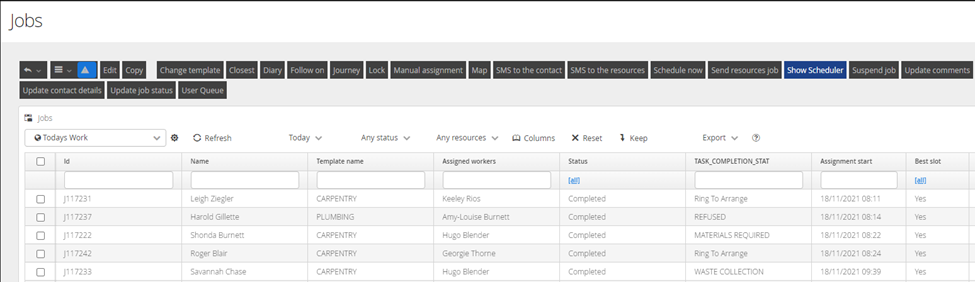
Viewing a Job
To access a Job, click on the Jobs menu item from the left hand navigation to be taken to the Job screen.
From here you can click on any job to be taken to the Job Details screen
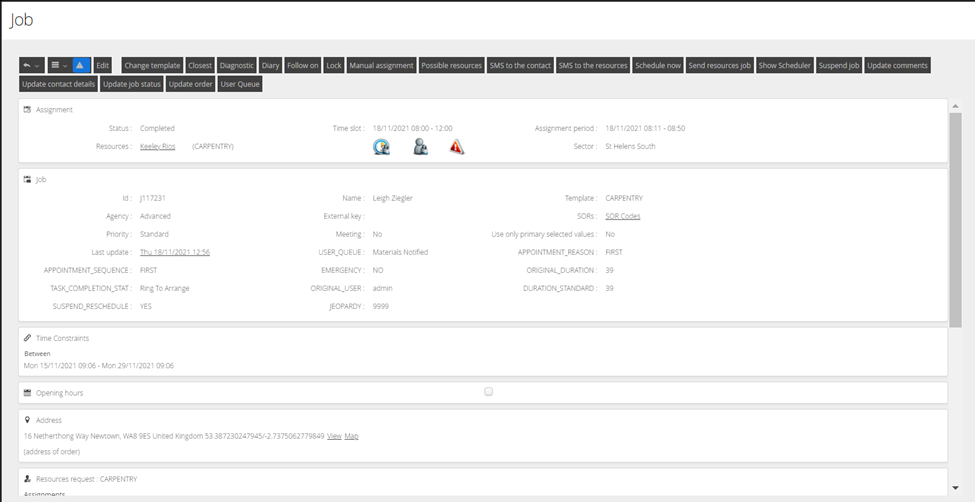
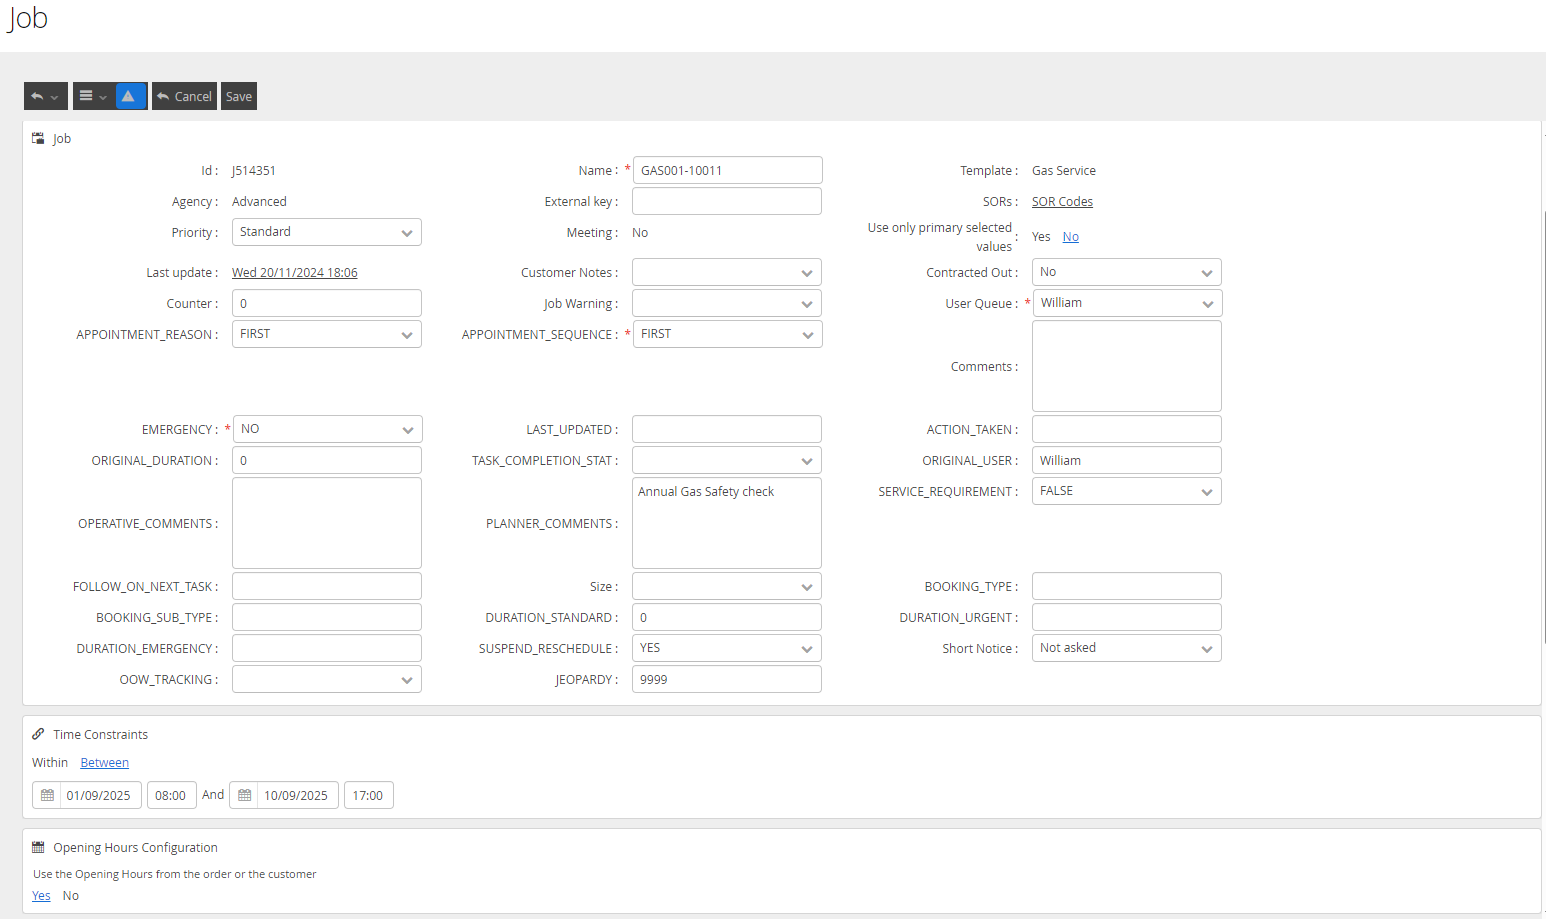
Detailed Fields on Jobs
The following table details the possible options within the Job. Fields marked in BOLD are mandatory. Customer & Order details are inherited from the data above.
Field Name | Description |
Name | Will usually contain the primary order number from the back office system and is used in views to search for Jobs. |
Appointment Reason | On initial creation this will be set to First as default. On rescheduling the Job there will be an option to change this Appointment Reason in order to state why it has been rescheduled. |
Appointment Sequence | On initial creation this will be set to First as default. When creating a Follow On as default it will change to Follow On. Sequences are often used to designate the stage of the Job for example with Gas Servicing it can be used to state 2nd visit, 3rd visit etc. |
Status | This is the current status of the Job. This will initially populate as New, then when scheduled it will change to Planned, as the job progresses it will change from Despatched, to Accepted, to Started, to Completed. The other possible status is Suspended if the job has been manually or automatically suspended. |
Time Window / Time Slot | For new Jobs this is the window that DRS will look for appointments within, this is based on creation date to target date. Once the appointment is scheduled this will change to Time Slot and show the appointment that was selected. If a job has been scheduled as a Floating Job (Schedule Now) then this Time Window will remain showing and the appointment period will float between these dates / times. |
Assignment Period | On new jobs this will be undefined, however once the job is scheduled the assignment period will change to the point within the Time Slot the job is planned into the Workers diary. This can change within the Time Slot when dynamic scheduling and optimisation kicks in. |
Worker | Will be blank on new jobs, once the Job is scheduled this will populate with the allocated worker |
Sector | When a Job is created it will take the postcode from the Customer location and check against the sector records to populate which sector this Job falls within. This is then used within the scheduling parameters. |
Duration | The duration of the job based on SMV value (will also populate quotas fields DURATION_STANDARD / URGENT / EMERGENCY) |
Service Requirement | TRUE/FALSE value - identifies if this job is setup for cyclical servicing |
Emergency | YES/NO value – identifies if the job has been classified as an emergency based on priority configuration |
User Queue | Initially populated on created from back office system with the same value as the Original_User field. See here for more information on the user queue |
Suspend Reschedule | As per default this option does not do anything. This however can be enabled in the database configuration to automatically try to reschedule any suspended job that has this switched to YES. |
Planner Comments | This enables the option to be able to add additional comments from the planner against the Job of which is sent down on the get schedule request from the mobile device. |
Editing a Job
Select a Job by placing a tick in the check box and selecting edit (or by right clicking your mouse on the entry), this will take you back to the Job Details screen for amendments to be applied, once done click save.
Deleting a Job
Select a Job by placing a tick in the check box and selecting Delete, this will remove the Job from the system.